Audacity degli anni 80! – Sincronizzatore di registrazione audio VIC 20 SMPL molto raro in quanto non si tratta di una macchina uscita così da casa Commodore ma un adattamento per gli usi descritti. Il sistema SMPL è costituito da un’unità computer / telecomando e una cartuccia software, con un’unità di interfaccia opzionale montata su rack per le funzioni estese di “Blocco SMPL”. Il computer ha bisogno di un monitor (sebbene si affermi che il sistema è così facile da usare che è possibile lavorare con il monitor spento se produce fastidiose alte frequenze) e il rack-box ha bisogno di cavi adeguati per interfacciarsi con le macchine e gli strumenti a nastro.
In effetti sono dei VIC20 con la tastiera mutilata e imbullonata rimarchiati da SMPL System per uso con una cartuccia particolare. SMPL System è una ditta ancora attiva (vedi qui http://smplsystems.com/) che produce sostanzialmente sistemi audiovideo per scuole, università e amministrazioni.
All’epoca serviva uno strumento economico per pasticciare coi macchinari per l’editing audiovideo, dato che si faceva tutto coi ruotoni di nastro e non col Macbook Pro, iMovie e Da Vinci Studio.
Come spiega il buon David Murray, oggi probabilmente avremmo deciso se spenderci 2000 pippi su un iMac o 100 carte per un Aruduino o un Raspberry Pi, attaccarlo alle macchine che già avevamo davanti e farle trottare.
All’epoca il Raspberry non c’era e l’Arduino nemmanco.
Potevi invece scrivere al volo un programma per il Commodore 64 o il VIC20 e usarlo come controller. Del resto la Control Port e la porta Cartucce del VIC e del Commodore erano lì apposta. Seriamente, su “La Nuova Elettronica” ci trovavi gli schemi per collegarle a tutto, letteralmente pure alla macchinetta del caffè per accenderla e spegnerla, i Commodore erano la Raspberry Pi400 degli anni ’80.
E il VIC 20 dall’uscita del Commodore 64 in poi è stato venduto anche a un terzo del prezzo. Ora, a SMPL serviva sostanzialmente un controller per un macchinario di editing audio-video che già avevano. E che accettava input letteralmente da qualsiasi cosa.
Potevano spendere un bordello di soldi per farsi fare un computer apposta, oppure delle schede per un computer costoso. Oppure prendere un VIC-20, mettere su cartuccia un programma e dei connettori e usarlo.
Ma fatto 30, SMPL fece trentuno: quel software dove anche essere facile da usare e il macchinario presentarsi figo. SMPL comprò un casino di VIC20, ma un casino, strappò via tutti i tasti che non servivano (tra cui lo Shift-Lock, proprio tagliato e non solo dissaldato), ridipinse con la vernice per plastica quelli che restavano in modo da renderli riconoscibili e fece imbullonare sulla scocca una placca coi loro marchi e le istruzioni per fare i montaggioni.
Perché questo era, e e sarà il bello di Commodore. L’estrema semplicità del VIC20, che se ci pensi è ancora più semplice come costruzione del Commodore 64, lo rende una macchinetta ideale per farci ogni sorta di bizzarro esperimento.E quando i VIC20 erano tanti e poco costosi, potevi anche massacrarne uno, chissene importava ![]()
La cosa bella, come hai visto nel video, è che la modifica riguarda veramente solo la tastiera e i rivetti nella scocca per tenere ferma la placca col marchio e le istruzioni.Se tu prendi un VIC20 rimarchiato SMPL e gli reintegri una tastiera funzionante quello è un VIC20 e funziona con tutto.
Se gli metti giochi su cartuccia quelli partono sicuro perché non c’è bisogno dei tasti.Potresti anche attaccargli il 1541, è ancora un VIC20.Solo che mancano i tasti L-O-A-D -,- e -shift-, quindi non puoi scrivere ” LOAD “*”,8,1 ” e non puoi operare il floppy in alcun modo
Stefano Gigante
Sound On Sound – Jun 1986
Donated & scanned by: Bill Blackledge
Synchronous Technology’s SMPL system has only recently been introduced in the UK, but in the States it has been on the market with great success for some time. Its appeal lies in its versatility, relative simplicity and budget price, although it has to be said that synchronisation, in general, remains one of the most complex subjects in audio recording.
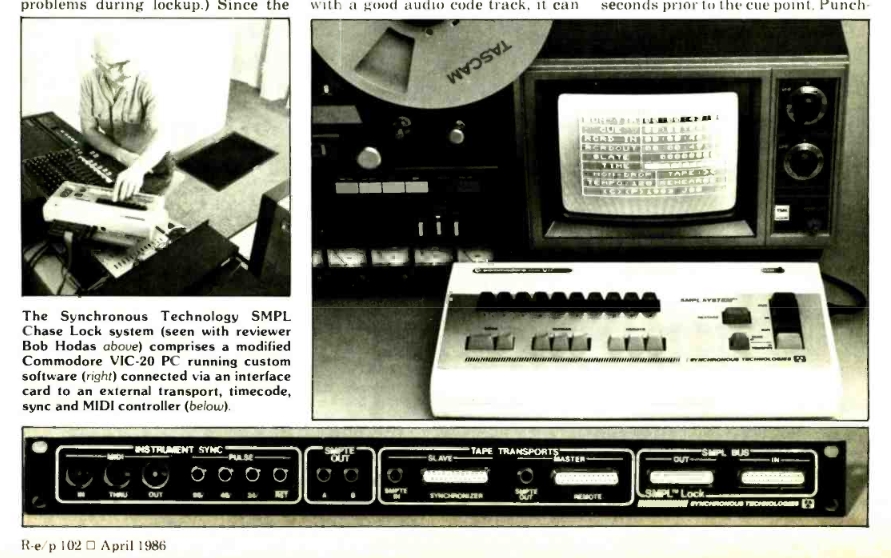
The SMPL system consists of a computer/remote control unit and software cartridge, with an optional rack-mounted interface unit for the extended ‘SMPL Lock’ facilities. The computer needs a monitor (although it’s claimed that the system is so easy to use that you can work with the monitor switched off if it produces annoying high frequencies) and the rack-box needs suitable cables to interface with your tape machines and instruments. Naturally, the exact details of connection will depend upon your own applications for the SMPL system.
We examined the SMPL system at The Green Studio in North London, where it has recently been installed for synchronisation of a Lyrec 24-track to a Sony U-Matic video machine. That’s just one possible application of the system – it could be used to lock two tape machines together or to lock a Song Pointer-generating sequencer such as C-Lab to tape and so on. In fact, SMPL will synchronise all sorts of signals from SMPTE to MIDI to pulse trains for drum machines.
Before going on to explain the setting up and uses of the system, it may be as well to add a few words about SMPTE. The Society of Motion Picture and Television Engineers’ synchronisation code consists of digital time signals recorded onto tape and interpreted by a SMPTE reader which controls the tape transport or SMPTE-controlled device. SMPTE codes are measured in hours, minutes, seconds and frames – there being 30 frames in one second, or 25 if you use the European version of SMPTE (virtually the same thing as EBU code).
In fact, the exact figure for SMPTE transmission compatible with NTSC colour television in the States is 29.97 frames per second, known as Non-Drop Frame SMPTE.
To catch up with the 30fps standard, Drop Frame SMPTE was introduced – this skips two frames in every minute except each tenth minute starting from the ‘zeroeth’ minute – following?
It’s also possible to run SMPTE at 24 frames per second to synchronise with large-format film, as on TV and in the cinema. But how does all this affect the SMPL system? The answer is – not much. SMPL only generates Non-Drop Frame SMPTE and its instrument sync features only work on Non-Drop codes. But the system’s auto-locate, auto-punch-in and event programming and soon, will work on any of the codes mentioned, thanks to a clever ‘learning’ routine in the software.
SET-UP
Setting up the basic SMPL system is quite straightforward. The control unit is a Commodore VIC-20 computer, and the SMPL software cartridge fits into its cartridge port. Monitoring is through a modulator connected to a rear panel port and the power supply is that supplied with the computer (the rack-unit if used needs another 9V mains transformer).
The computer has SMPTE In/Out connections and Roland-type Sync, along with Clock outputs for drum machines running at 24, 48 or 96 pulses per quarter note (ppqn), the clock speed being altered from the default value of 24 ppqn by holding down various right-hand buttons on power-up. Many of the VIC-20’s standard buttons have, in fact, been removed for the version that comes with the SMPL system, and a new top panel labels the remaining buttons clearly.
The basic display lists SMPTE readout, Run Time, Cue, Record In/Out points, Slate, Time, Format, Tempo, Tape Status, Mode and Date. When you start using the system you should lay one minute of timecode on the start of the tape to allow the system to lock up – Run Time is therefore one minute less than the actual timecode being read from the tape.
Let’s look at these separate screen display parameters individually. Run Time is updated every 30th of a second when the system is beyond the one minute ‘leader’. A value for Cue can be entered at any time by pressing the Cue button on the computer – this value is then displayed until it is changed, and Search-To-Cue will take the tape machine forward or backward to this point stopping within 15 to 29 frames of the cue point. These few frames are used to allow SMPL to sync up with the timecode; the clock output functions start at the Cue position too, so you could start a drum machine for an overdub at this point if you wanted.
Record In stores a value for entering Record mode for automatic punch-ins, and Record Out handles the punch-out.
Overdubs have never been easier! Slate is an eight-digit identifier which you can programme for a particular song or take, allowing you to quickly find the appropriate song or take on your tape.
The Time display shows SMPTE time with visual prompts for ‘Leader’, ‘Stopped’, or ‘No Sync’ – which means the tape is running but SMPL is not receiving a SMPTE code. The Format box shows the type of SMPTE used – for instance ‘Non-Drop’, while the Tape box uses the symbols »,«, ><, > and *> to indicate Fast-Forward, Rewind, Stop, Play and Record modes respectively. The default value for the Tempo setting is 125 bpm (fairly average speed) and the Mode box can show Rehearse, Entry, Event, Write, Take or 10-point Locate modes, terms which we’ll examine next.
Beyond the basic SMPL screen page are three others: Entry, Event and Write. The opening page is labelled Rehearse, and simply allows you to set the cue, punch-in and punch-out points without actually going into record. In Rehearse mode the system produces a metronome click and beeps through the monitor at the appropriate points, acting as a vital count-in substitute. Holding down the Take and Transport buttons activates the Record function and you can also use the Search-To-Cue facility within Rehearse mode.
Hitting the Advance button takes you on to the Entry page, which allows Tempo, Cue and In/Out times to be altered using the 1-0 number keys on the VIC-20. As long as you remember to enter all the zeros eg. 00:01:07:00 for 1 minute 7 seconds, and avoid frame numbers missed by Drop Frame operation, you’ll be OK.
The Write screen is similar to the two above but allows you to input a new Slate number for the song or take. That done, you can hit Advance again to make the system generate SMPTE code so that you can initially ‘stripe’ your multitrack tape.
The final screen, Event, is a little different. It simply consists of eight time settings numbered Event 1-8 which can later be used to trigger externally connected devices while the tape is playing back. Figures from the Cue and Record In/Out boxes can be transferred quickly to the Event page using the Exchange key removing the risk of mis-typing numbers.
SMPL IN ACTION
Let’s assume we have recorded a SMPTE track on to one of the outside tracks of our tape machine. Feeding the track back to the SMPL unit should result in a timecode reading appearing on-screen – if ‘No Sync’ is shown, the playback level can be adjusted until the system locks up to the minute-long timecode ‘leader’ section. The manufacturers wisely suggest using the other tape tracks during this one minute period for the recording of audio test-tones, drum and synthesizer data, or even verbal notes about the music.
If you overshoot the SMPTE strip you will get the message ‘Stopped’ even if the transport indicator says ‘Play’ (>). If you have another timecode-striped song earlier on the tape you may find yourself locking to a Cue point in that one, which could be embarrassing. The manufacturers therefore recommend recording SMPTE on alternate tracks for each song, but it’s likely that you’ll want to keep the SMPL connections fixed permanently once you’ve started using it, so that isn’t an ideal solution.
Once you’ve programmed punch-in and punch-out points, you can cycle around them repeatedly just by using the Transport button, which returns to the start of the overdub loop from Play mode. Yellow bands appear on-screen behind the In and Out points when they have been entered, and a red band appears behind the Record indicator when in Record mode and these help keep you alert to what’s going on. Remember that you’ll need your video monitor volume turned up to hear the rehearsal mode bleeps and the metronome click.
When you want to record your efforts, it’s simply a matter of hitting both Take and Transport buttons rather than just Transport. If you like, you can synchronise a drum machine to play throughout a piece or simply during short overdubs – deriving the necessary clock from SMPTE code is far more reliable than using a drum machine’s own sync-to-tape signal, and has the added benefit of freeing up all its clock and trigger outputs for connection to arpeggiators, sequencers and so on.
However, using the Event page to trigger drum sounds, repeat echo holds or whatever can be complex, since it requires some rather special interfacing. SMPL generates logic signals rather than anything easy like S-triggers, with eight pins of the accessory port serving to transmit the signals. TTL or CMOS triggers can be driven directly from this Event output, although in some cases you’ll need to invert or ground the signals. An interface/mute panel for the accessory port is available, and theoretically it’s capable of stepping along synth patches, starting auto fade-outs or fade-ins, starting and stopping drum machines and so on.
Another potential problem area lies in the connection of your particular tape machine to SMPL, whether audio or video, but the UK suppliers of SMPL, Audio Services of Stockport, will take care of that. The system as it stands currently is basically calibrated for Tascam Series 40 or 50 recorders, but can be connected to and adjusted for almost any other machine – from a cassette deck to a U-Matic video recorder, including Fostex, Otari, JVC, Sony and Panasonic machines. Instructions are supplied for carrying out or changing the calibration yourself if you think you can handle it.
SMPL LOCK
So, to reiterate, the basic form of SMPL will lay down and read SMPTE codes on tape and can provide cue points, automated punch-in and punch-out, triggers and Sync. But if you want to control tape machines you need the ‘SMPL Lock’ expansion which also offers MIDI synchronisation.
If this is the case, the connector from the rack-box replaces the firmware cartridge of the basic system, and the internal software is slightly different. The two tape machines in use are designated Slave and Master, the Slave needing either a voltage or a frequency control input for its speed variation. Timecode inputs and outputs for both machines now go to the additional rack-box, and there are two main operational modes: Lock and Chase/Solo.
In Lock mode the system works more or less as before but controls both machines rather than just one, permitting relatively cheap and versatile track multiplication if you’ve chosen to use two audio multitrack machines. Solo mode commands only the Slave machine, while Chase mode allows you to work the Master machine from its own controls and makes the Slave lock up to it. This is ideal for synchronising tape to video machines, even to cheap ones such as domestic VHS machines which have no motor control inputs.
The other advantage of the rack-box is that it has a MIDI output, which will work efficiently as long as you have entered the tempo and song time on the Entry page. SMPL produces MIDI Song Pointer information (or should be doing so by the time you read this, software arrival permitting), but whether your drum machine or sequencer can accept this information is up to you to establish.
SMPL Lock has a couple of added features on the Rehearse page. One is Offset, which specifies an offset time between the Master and Slave machines which can be determined by the user. On the Format display, the two SMPTE formats must be identical for proper operation to ensue, and the Slave window shows the commands sent to the Slave machine while Tempo, Mode and Slate remain as before.
SMPL Lock uses some different cables from the basic SMPL system but a few diagrams are provided in the system handbook, and again the dealer will help out. Software updates between the launch of the basic SMPL and the SMPL Lock version change some of the key functions, particularly of the Transport button, but the company issues updates regularly to all users so it shouldn’t be difficult to keep up.
In both set-up and operation, the efficiency of SMPL depends very much upon what you’re doing with it. Initially the system seems complicated to wire up – with video, multitrack and mastering machines connected there’s a veritable tangle of multiple connectors coming from the rack-box – but compared to some other synchronisation systems, SMPL is still relatively compact.
The software for the system is being constantly upgraded to include more efficient operation and new developments in MIDI and SMPTE. Since there are no redundant controls on the VIC-20 remote unit, the basic functions are more easily reached than on a system using an unmodified home computer, although the VIC-20 is a little bulky to sit on the lap and also suffers from having the firmware cartridge, power and video leads projecting from the back in the basic system. In the SMPL Lock system though, a very long multi-way lead connects to the rack-box instead of the firmware cartridge.
OPINIONS
Basically, SMPL is a problem-solver. Your problem may involve tape machine synchronisation, video synchronisation, or synth-to-tape synchronisation via SMPTE. In any case the system has the power to solve the problem, although doing so will need a good deal of help from the dealer in the initial setting-up stage – advising on interface cables and so on. It’s best to check that your particular tape or video machines can be controlled by SMPL at all, although it seems likely that all common makes can be brought under control one way or another.
Overall, SMPL provides a service on a budget and does it with the maximum of efficiency and the minimum of fuss. The US manufacturers, Synchronous Technology, seem to be on the ball as regards updates and set-up information, so SMPL looks like a system that you can grow with – perhaps from your first VHS machine and Tascam 8-track to your dream audio/video/MIDI studio.
Thanks to Harry Davenport and The Green Room 24-track studio (Contact Details) for providing the demo facilities.
Price: £1495 (ex VAT) including rack-box and leads.




Salve, hai creato un bellissimo sito riguardo un bellissimo computer!
Essendo appassionato di 8 bit Commodore non posso che farti dei complimenti!
Se vuoi inserire una periferica piuttosto curiosa, potrei inviarti delle foto del mio VIC 20 Arfon Micro, che ha anche un chip VIC ceramico!
Ho un piccolo canale YT che si chiama M D il microcanale, già ho fatto dei brevi video a riguardo, uno in cui esego un demo con l’Arfon e l’altro esplorativo, dove lo smonto per vedere meglio.
Ho una diversi C64 e VIC 20, compreso il vic 20 giapponese e pure il 1001. Ho anche un curioso KIM-1!
Ciao e continua così!
Grazie Marco, ovviamente sarò lieto di inserire il materiale da te inviato, anzi puoi registrarti e farlo tu stesso, anche segnalando i link di tuoi interesse.
Dio ti benedica, Alex
Ciao, hai una mail dove posso inviarti delle foto?
Non sono sicuro invece di riuscire a fare un buon lavoro registrandomi (non sò nemmeno dove) e creando un articolo, se è questo quello che ho capito!
Ho visto anche un articolo riguardante la dissipazione dei vari chip e posso dirti la mia esperienza a riguardo: essendo il vic20/c64 quasi chiusi è consigliabile usare dissipatorini con alettatura larga (mi pare lo disse anche Ray Carlsen). In effetti dai test che ho condotto qualche anno fa, inserendo dei dissipatori ad alettatura larga la temperatura si abbassa. Ora, è vero che la soglia di funzionamentodei chip è alta, ma è anche vero che un funzionamento più fresco dovrebbe garantirne una maggior durata. Un po come i vrm delle schede video attuali, utilizzano componenti che possono operare a 90/100 gradi centigradi per un determinato periodo di vita, che si allunga se questi vengono dissipati adeguatamente.
I pezzi che uso più spesso li ho dotati di dissipatori, attaccandoli con del semplice nastro biadesivo. Ho condotto vari test che mi confermano che la colla del biadesivo funge come pasta termica e lo spessore ridotto della plastica che compone il nastro è irrilevante come impedimento termico. Ho fatto una marea di altri esperimenti su come sfruttare la scatoletta del VIC2 (su c64 con schede madri che ne sono dotate) per avere una maggior dissipazione rispetto alla sola linguetta integrata.
Ci tengo molto a preservare queste macchine, ma in certi casi dove ci sono revisioni di chip piuttosto antiche, preferisco far qualcosa per rinfrescarli! Come con questo: https://www.youtube.com/watch?v=1-2-b_Z6K_4&t=4s
https://www.youtube.com/watch?v=Zpsvi8Axvzw
è possibile togliere ogni modifica con poco sforzo!
scusa il papiro!
Ottimo grazie per le info che condivido subito…
questa la mia email:
alessandro.ceralli ovviamentechiocciolina gmail.com